

Oledrion (MyShop) Tutorial coming to XOOPS

Oledrion (MyShop) is the best and most comprehensive e-Commerce module developed natively for XOOPS!
It was developed originally by Hervé Thouzard (aka Hervet) from XOOPS France, and lately it was enhanced by Hossein Azizabadi (aka Voltan) from XOOPS Iran.
I am working right now on a tutorial for Oledrion - it is still work in progress, but you can read it already on GitBook
But it would be fantastic if some of you could fork it on GitHub and contribute to it, and make it better!

The MVC pattern in Common Utilities

Probably very few of you know it, but Common Utilities have included since version 2.2, a basic implementation of the pattern MVC (Model - View - Controller). In this article I will give you a basic explanation of its operation in Common Utilities and integrated modules. If you still do not know what MVC is, please read this article on Wikipedia to learn more about it. How MVC works in Common Utilities When a module uses the MVC features of Common Utilities, all requests are received through the URL and it's the job of RMCommon to receive, process and direct them to the appropriate module. To achieve that, RMCommon includes an appropriate option to specify where to receive requests for each module. This is done through the configuration, indicating the URL you use each module. For example, if the module is that we look for is located in the "inventory" directory, and RMCommon configuration has established as their path to the folder "inventory" when RMCommon receives a request to the URL http://sitio.com/inventorios automatically redirect the request to http://sitio.com/modules/inventory . This means that the module will respond to all requests made with misitio.com/inventarios . URL Parameters Once RMCommon knows where to locate each module, you can tell that we get the module by specifying the parameters of the URL. Parameters provided must be written in the form module / controller / action / other-parameters . This simple format allows all requests to the module, which are handled by RMCommon follows: Common Utilities finds the appropriate driver folder controllers within the module's directory. Take for example the URL http://sitio.com/ library / books / list / category / bestsellers / The process is as follows: The corresponding module is located library. Depending on the routes that have been configured, this directory could match the directory of the module or be a different one. In this sample library is the directory of the module. Common Utilities driver looking books in the directory controllers of the module library , and loads the PHP class. Now find the corresponding method to the action list and processes the request by passing the parameters category = bestsellers . These parameters must always be in pairs. After processing the data, Common Utilities get the template (view) and returns the corresponding result. Some conventions in this How to locate the controllers? To begin, the drivers should be located as files within the directory controllers of each module. In addition, there are certain rules for naming files that contain drivers. In our example (yes, the library) the driver file should be called books-controller.php . In addition, this file should contain a class, the controller itself, named as follows: Library_Books_Controller and must inherit from the main class RMController . Finally, the class must contain a method called list , which will be invoked by RMCommon to present a result. Until here everything is clear? So these are the rules: - The driver files must be located in the directory controllers of the module. - The file name must follow the rule
le="color: #000000"><?php class Mymodule_Nombrecontrolador_Controller extends RMController { use RMModuleAjax , RMProperties , RMModels ; public function __construct () { parent :: __construct (); $ this -> default = 'index' ; // default action $ this -> controller = 'categories' ; } public function index () { // Logic index action $ This -> tpl -> header () requires $ this -> parent -> view ; $ this -> tpl -> footer (); } }
What about the models? Models are only accessible through the controller. This means that they can only be used by the methods of the controller class. The models also have some specific rules: - Must be located in the module's /models folder . - A model file must be named as le="color: #000000"><?php class Mymodule_Nombremodelo_Model extends RMActiveRecord { use RMModels ; public function __construct () { parent :: __construct ( 'model' , 'module' ); / ** * Titles table fields * / $ this -> titles = array ( 'column' => __ ( 'Column Title' , 'module' ), 'column2' => __ ( 'Title column2' , 'module' ), ... ); } }
And the views? Eventually we get the Views. These are actually templates that are derived from the name of the action. For the above example, where the module is used library and the driver is requested books for executing the method (action) list , Common Utilities get the template list.php , because it is the one that corresponds to the action list . Easy, right? It follows that the view files (templates) should be appointed as the action (controller method) running. If our action is the name of form , so our staff must be appointed form.php . If the action is the name -form categories , also our file should be named categories-form.php . One more thing. The Views, as in any module, should be stored in the directory templates module, but not directly, but in appropriate subfolder, depending on the following cases. - Templates Folder can contain standard templates (as commonly used in the modules). - Modules can have templates for the control panel or section templates for public, therefore within the directory /templates there should be two subfolders: backend and frontend . - Within each of these subfolders there should be a new subfolder for each driver that handles Views. If the driver is called categories, then there must be a subfolder called categories where the Views will be kept for each action. This new approach of module development in XOOPS enables faster and more structured development. Furthermore, with its auxiliary objects, Common Utilities facilitates the implementation of AJAX in modules allowing more intuitive and easy to use experience for users.
Excellent Tutorial in Spanish: Adapting HTML and CSS Templates to XOOPS
Tony Rod has published an excellent video tutorial about "Adapting HTML and CSS Templates to XOOPS":
This is what he writes in his blog:
XOOPS has always been known for being a powerful and flexible CMS, however despite this, the creation of my own themes without relying on already available themes for XOOPS was always of interest to me, especially since the available themes were very similar with the same structure.
That's why a few years ago I challenged myself to learn how a template works in XOOPS and what is needed to develop a different theme that suits my needs and above all, has a unique design .
I finally found the answer and that is why now I share what I've learned over the years using XOOPS, and hopefully it will help all those who want a unique and different design without having to worry about whether they are doing it the right or wrong way when adapting the template to XOOPS.
Basically this tutorial is divided into four sections which are:
- Introduction and basics of templates in XOOPS
- Process of adapting a template in HTML to XOOPS
- Multiple templates on our site using Defacer
- Adding blocks manually by ID
The tutorial is designed in such a way that you can follow step by step the whole process from the adaptation of the template to the finished product. To make it easier for you, I am providing the course material so you can do the necessary tests. This material can be found on the download section of downloads or by clicking here.
I hope this tutorial is helpful to start designing your own templates and will inspire those who want to improve the content of their websites.
I will answer all your questions and / or comments in the comments section of this publication.
Read more... | 4 comments
This is what he writes in his blog:
XOOPS has always been known for being a powerful and flexible CMS, however despite this, the creation of my own themes without relying on already available themes for XOOPS was always of interest to me, especially since the available themes were very similar with the same structure.
That's why a few years ago I challenged myself to learn how a template works in XOOPS and what is needed to develop a different theme that suits my needs and above all, has a unique design .
I finally found the answer and that is why now I share what I've learned over the years using XOOPS, and hopefully it will help all those who want a unique and different design without having to worry about whether they are doing it the right or wrong way when adapting the template to XOOPS.
Basically this tutorial is divided into four sections which are:
- Introduction and basics of templates in XOOPS
- Process of adapting a template in HTML to XOOPS
- Multiple templates on our site using Defacer
- Adding blocks manually by ID
The tutorial is designed in such a way that you can follow step by step the whole process from the adaptation of the template to the finished product. To make it easier for you, I am providing the course material so you can do the necessary tests. This material can be found on the download section of downloads or by clicking here.
I hope this tutorial is helpful to start designing your own templates and will inspire those who want to improve the content of their websites.
I will answer all your questions and / or comments in the comments section of this publication.
Tutorial: add a nice frame around your pictures
The summer is here and it's time to publish news with your holidays pictures in your web sites...
Here find a new tutorial for improve your design, more modern, more pro.
i Hope you will like it...
In fact, we would add a white frame aroud your pictures with an shade effect.
 look at the result here before ! ======> After !
OK, let'ssss go for this tutorial :
1) Add a new style in the css files
Open and edit your style.css file in your theme,
located in /themes/my_theme/css ou /themes/my_theme
and add, at the end this code :
then save it and upload in your web site.
You have just done the harder work in this tutorial. Yesss !!!
2) Erase cache of your browser
Just to do for the 1st time.
3) Use this new class with a picture
3a) Basic Editor (Textarea)
See 3b)
3b) XOOPS Editor (DHTMLTextarea)
In bbcode, it doen't work. We can't add a class in a bbcode.
If you work a custom block; choose Content Type : "HTML".
Then insert you picture like that :
<i mg src="http://www.mysite.fr/my_picture.png" class="img-frame" />
3c) TinyMCE (v3)
- Click on the button "insert picture",
- Type something in the fields "URL", "Description" and "Title",
- Click on the tab named "Apparence" and choose for the field "class", in tke list, "img-frame" then ok
So, Easy, no ?
Don't hesitate to test yourself !!!
To continue to work deeper :
- Modify the color of the frame (here white), by a "old yellow" for black and white old style for pictures,
- Modify the color of shade,
- Modify the direction of the shade,
- Modify the width of the shade,
- Finally, we could add dynamic effects (zoom in for exmple on hover) but be carreful, not too effect, please...
If you like our tutorial, tell it us.
PS : Kris said (in frxoops.org) that we could use a an existant class in xoops.css :
class="pad10 boxshadow" but the effect is not the same, but so easy to use, no need to change the css style.
Read more... | 15 comments
Here find a new tutorial for improve your design, more modern, more pro.
i Hope you will like it...
In fact, we would add a white frame aroud your pictures with an shade effect.
look at the result here before ! ======> After !OK, let'ssss go for this tutorial :
1) Add a new style in the css files
Open and edit your style.css file in your theme,
located in /themes/my_theme/css ou /themes/my_theme
and add, at the end this code :
le="color: #000000"><?php img.img-frame { /* Couleur ombre de la photo */ box-shadow: 5px 5px 20px #404040; /* Effet cadre vielli, pour photo noir et blanc style ancien */ /* border-color: #f5eac7; */ border-color: #ffffff; border-style: solid; border-width: 20px; display: block; margin-l; margin-left: auto; margin-right: auto; margin-top: 10px; margin-bottom: 10px; }
then save it and upload in your web site.
You have just done the harder work in this tutorial. Yesss !!!
2) Erase cache of your browser
Just to do for the 1st time.
3) Use this new class with a picture
3a) Basic Editor (Textarea)
See 3b)
3b) XOOPS Editor (DHTMLTextarea)
In bbcode, it doen't work. We can't add a class in a bbcode.
If you work a custom block; choose Content Type : "HTML".
Then insert you picture like that :
<i mg src="http://www.mysite.fr/my_picture.png" class="img-frame" />
3c) TinyMCE (v3)
- Click on the button "insert picture",
- Type something in the fields "URL", "Description" and "Title",
- Click on the tab named "Apparence" and choose for the field "class", in tke list, "img-frame" then ok
So, Easy, no ?
Don't hesitate to test yourself !!!
To continue to work deeper :
- Modify the color of the frame (here white), by a "old yellow" for black and white old style for pictures,
- Modify the color of shade,
- Modify the direction of the shade,
- Modify the width of the shade,
- Finally, we could add dynamic effects (zoom in for exmple on hover) but be carreful, not too effect, please...
If you like our tutorial, tell it us.
PS : Kris said (in frxoops.org) that we could use a an existant class in xoops.css :
class="pad10 boxshadow" but the effect is not the same, but so easy to use, no need to change the css style.
Highlighting non-empty alphabet listing in XoopsTube
In XoopsTube we have a visual alphabetical listing of videos, so if you would like to see all videos starting with "B" you would click on the image with "B". Unfortunately, this is not the most user-friendly feature, because we don't know if there is anything under "B". So we needed to indicate the existence of videos by a changed background icon, as you can see below: 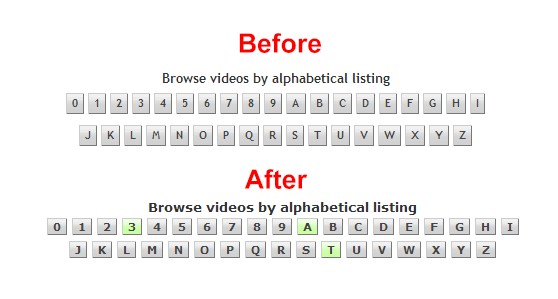 The plan was to: 1) build an array of unique alphabet letters that have videos in the database 2) as we render the alphabet icons, check for each letter/digit if it is also in the above array, and if yes, change the icon image to the green one XoopsTube renders the images in the function xoopstube_letters() located in /include/functions.php As first we needed to extract the unique letters from the database and create the array:
Read more... | 9 comments
The plan was to: 1) build an array of unique alphabet letters that have videos in the database 2) as we render the alphabet icons, check for each letter/digit if it is also in the above array, and if yes, change the icon image to the green one XoopsTube renders the images in the function xoopstube_letters() located in /include/functions.php As first we needed to extract the unique letters from the database and create the array: le="color: #000000"><?php $distinctDbLetters_arr = array(); $sql = 'SELECT DISTINCT (UPPER(LEFT(title, 1))) AS letter FROM ' . $xoopsDB->prefix('xoopstube_videos') ; if ($result = $xoopsDB->query($sql)) { while ($row = $xoopsDB->fetchArray($result)) { $distinctDbLetters_arr[] = $row['letter']; } } unset($sql);
As second, we wanted to check for each alphabet letter and digit to see if it is represented in the database: le="color: #000000"><?php if (in_array($ltr, $distinctDbLetters_arr)) { $letterchoice .= '<a class="xoopstube_letters xoopstube_letters_green" href="'; } else { $letterchoice .= '<a class="xoopstube_letters" href="'; }
And we had to create a new class in CSS that would pull the new image: le="color: #000000"><?php .xoopstube_letters_green { background-image: url(images/icon/backgnd_green.png); }
Things to do in the future: - cache the array created in (1), so we don't have to read it every time from the database, and updated it only if a new video is added The main message from this tutorial is to make our modules more user-friendly by visually indicating status of information. As always, if somebody has a better way to achieve it, please share it with us!
YouTube plugin Installation in the TinyMCE editor
Hello Xoopser !!!
Today, i want to show to you how it's easy to add a new plugin in the TinyMCE editor.
Why not try with the youtube plugin ?
Ok, sooooooo, let's go !
1) First, download the youtube plugin here (Zip File here)
2) Extract zip and copy the directory /youtube in /class/xoopseditor/tinymce/tiny_mce/plugins/
in your XOOPS installation
3) Modify the /class/xoopseditor/tinymce/settings.php file
You could re-read the news Using templates pages in modules.
The part 2 : "Add the template botton".
Add "youtube" in :
Line 70
Line 85
4) That's All ! Now, Enjoy it
Maybe in the next XOOPS version it would be included by default...
Read more... | 2 comments
Today, i want to show to you how it's easy to add a new plugin in the TinyMCE editor.
Why not try with the youtube plugin ?
Ok, sooooooo, let's go !
1) First, download the youtube plugin here (Zip File here)
2) Extract zip and copy the directory /youtube in /class/xoopseditor/tinymce/tiny_mce/plugins/
in your XOOPS installation
3) Modify the /class/xoopseditor/tinymce/settings.php file
You could re-read the news Using templates pages in modules.
The part 2 : "Add the template botton".
Add "youtube" in :
Line 70
le="color: #000000"><?php "paste,fullscreen,visualchars,nonbreaking,inlinepopups,youtube",
Line 85
le="color: #000000"><?php "theme_advanced_buttons4" => "xoopsimagemanager,xoopsemotions,xoopsquote,xoopscode,xoopsmlcontent,youtube",
4) That's All ! Now, Enjoy it
Maybe in the next XOOPS version it would be included by default...
Tutorial: How to update tables to follow XOOPS' new naming scheme?
As you might already know, there is an effort to standardize our module development - from using the same module Admin GUI structure, to using the same icons across all modules, from using the same pagination structure for each table, to naming the tables and fields in a consistent way (see this thread). This tutorial will show you how to modify your module so it can rename the tables on the user site, when the user updates the module. This will follow the scheme suggested by alain01 The new table naming scheme is: mod_AAA_BBBB where AAA is the name of the module, and BBB is the name of the table. For example, when we have in the News module a table called "topics", in the new updated version of News, it will become: mod_news_topics Here are few steps to follow, as used recently in the Pedigree module called "animal": 1) The new version should have the tables defined properly in the SQL file, so new installation have the right tables installed right away 2) In the existing installation the users normally copy files over, and then run "update" in the Admin. Therefore we'll need to add a file with the updates. We'll call it "update_function.php" and will place it in /include folder 3) In order for XOOPS to call this file, we'll add in xoops_version.php file following:
Read more... | 4 comments
le="color: #000000"><?php $modversion['onUpdate'] = 'include/update_function.php';
4) In that file, we start by adding a function to check if the table that we want to rename, does actually exist. This is done by using a function created by Hervet: le="color: #000000"><?php function tableExists($tablename) { global $xoopsDB; $result=$xoopsDB->queryF("SHOW TABLES LIKE '$tablename'"); return($xoopsDB->getRowsNum($result) > 0); }
5) then we add a following function that will be executed when we click on the Update button: le="color: #000000"><?php function xoops_module_update_animal() { global $xoopsDB; if (tableExists($xoopsDB->prefix('eigenaar'))) { $sql = sprintf( 'ALTER TABLE ' . $xoopsDB->prefix('eigenaar') . ' RENAME ' . $xoopsDB->prefix('mod_pedigree_owner') ); $result = $xoopsDB->queryF($sql); if (!$result) { echo '<br />' . _AM_PED_UPGRADEFAILED . ' ' . _AM_PED_UPGRADEFAILED2; $errors++; } } return TRUE; }
In this code above, we are checking if the "eigenaar" does exist, and if it does, then we're renaming it to "mod_pedigree_owner'". Of course, this is done for each table that we want to rename. 6) We also have to rename all occurrences of the tables in the code as well. a) as a first step, it's easy to just run search & replace using as part of the search the word "prefiix", so in our example, we'll replace: prefix("eigenaar") with: prefix("mod_pedigree_owner") This is for cases where we call the tables in a conventional way. b) But people are creative, and it might happen that they do it differently, so nothing will save us from testing, and eventually searching for the word "eigenaar" in all files, and then making a judgment call if it is meant as a table and therefore has to be renamed. The new naming scheme will make it easier two things: - to see in phpMyAdmin (or any other database tool) all the tables from a module grouped together. It will also distinguish them from the Core tables. - in the code it will also make it easy to find the tables just by searching "mod_MODULENAME" In the near future, we'll also consolidate names and characteristics of the typical fields in our modules, and provide them as guidelines. When you look at our modules, the same field could be named differently in each module. Let's take "Group ID" - it could be: gid, g_id, group_id, gr_id, etc. And if you are trying to maintain a module from somebody else, we are wasting too much time trying to figure out what a particular field is actually for. If you have improvements for this tutorial, please let us know. And most importantly: - If you can help us to streamline and standardize module development, we would very much appreciate it. - If you like how a particular module does something and think that other modules should do the same, let us know. - If you see something cool being done by other Open Source Projects that XOOPS could benefit from, please let us know too. Please follow up in this thread
Tutorial: New design for block comments, step by step
 I would like share with you my experience with a new style of news: a step by step tutorial. In this edition, I will show you how to modify the comments block. The default design of this block is pretty old, so let's bring small but smart design changes to make the display more useful. Please let's see an exemple here (Not xoops web site). First, you should understand how overloaded theme work (surcharge du thème) The best tutorial for this is this one on XOOPS France (in French). We will start step by step in order to explain to you how it is possible, and in the end, you should practice these changes with another block. I will invite you to upload the files step by step, so it would be more clear for you. So, now, let's gooooooo !!!
  We need : - Template files comments from the system module - CSS file from your theme (style.css) 1 - Template files comments to the overloaded theme Copy the files /www/modules/system/templates/system_comment*.html to /www/themes/mytheme/modules/system - system_comment.html - system_comments_flat.html - system_comments_net.html - system_comments_thread.html 2 - Customization
  2a Head Now, we work on the files on /www/themes/mytheme/modules/system We start to delete the top head Edit the 3 files system_comments_*.html and comment this out (or delete this) :
 le="color: #000000"><?php <!-- <tr> <th class="width20"><{$lang_poster}></th> <th><{$lang_thread}></th> </tr> -->
Find theses lines - 2 times in system_comments_net.html and system_comments_thread.html - 1 time in system_comments_flat.html  2b - Delete poster's info - keep only avatar Now, all changes will be in the system_comment.html file (for the next one too) Delete information from user : - Rank - Registry date - Localisation - Contribution number - Status Just keep avatar
 le="color: #000000"><?php <div class="comUserRank"> <div class="comUserRankText"><{$comment.poster.rank_title}></div> <img class="comUserRankImg" src="<{$xoops_upload_url}>/<{$comment.poster.rank_image}>" alt="" /> </div> <img class="comUserImg" src="<{$xoops_upload_url}>/<{$comment.poster.avatar}>" alt="" /> <div class="comUserStat"><span class="comUserStatCaption"><{$lang_joined}>:</span> <{$comment.poster.regdate}></div> <div class="comUserStat"><span class="comUserStatCaption"><{$lang_from}>:</span> <{$comment.poster.from}></div> <div class="comUserStat"><span class="comUserStatCaption"><{$lang_posts}>:</span> <{$comment.poster.postnum}></div> <div class="comUserStatus"><{$comment.poster.status}></div>
become now le="color: #000000"><?php <img class="comUserImg" src="<{$xoops_upload_url}>/<{$comment.poster.avatar}>" alt="" />
 2c - Move poster' name , date and style Let's simplify the display comment date: So, replace
 le="color: #000000"><?php <tr> <td class="head"><a id="comment<{$comment.id}>"></a> <{$comment.poster.uname}></td> <td class="head"><div class="comDate"><span class="comDateCaption"><{$lang_posted}>:</span> <{$comment.date_posted}> <span class="comDateCaption"><{$lang_updated}>:</span> <{$comment.date_modified}></div></td> </tr>
by le="color: #000000"><?php <tr> <td><a id="comment<{$comment.id}>"></a></td> <td><{$comment.poster.uname}> said the <{$comment.date_posted}> (<{$lang_updated}>: <{$comment.date_modified}>)</td> </tr>
 2d - Same Date comments and modification comments ? We don't want to see the date twice, if it's the same date, so replace the previous code by
 le="color: #000000"><?php <tr> <td><a id="comment<{$comment.id}>"></a></td> <td><{$comment.poster.uname}> said the <{$comment.date_posted}> <{if $comment.date_posted != $comment.date_modified}> (modified the <{$comment.date_modified}>) <{/if}> </td> </tr>
 2e - Move buttons to the top Now, we want to move the buttons on the top. First, take the test code of poster, at the bottom file, and delete all lines with < td > et < /td >. So the partial code seems to be this now, with right style CSS :
 le="color: #000000"><?php <div style="float:right;"> <{if $xoops_iscommentadmin == true}> <a href="<{$editcomment_link}>&com_id=<{$comment.id}>" title="<{$lang_edit}>"><img src="<{$xoops_url}>/images/icons/edit.gif" alt="<{$lang_edit}>" /></a> <a href="<{$deletecomment_link}>&com_id=<{$comment.id}>" title="<{$lang_delete}>"><img src="<{$xoops_url}>/images/icons/delete.gif" alt="<{$lang_delete}>" /></a> <a href="<{$replycomment_link}>&com_id=<{$comment.id}>" title="<{$lang_reply}>"><img src="<{$xoops_url}>/images/icons/reply.gif" alt="<{$lang_reply}>" /></a> <{elseif $xoops_isuser == true && $xoops_userid == $comment.poster.id}> <a href="<{$editcomment_link}>&com_id=<{$comment.id}>" title="<{$lang_edit}>"><img src="<{$xoops_url}>/images/icons/edit.gif" alt="<{$lang_edit}>" /></a> <a href="<{$replycomment_link}>&com_id=<{$comment.id}>" title="<{$lang_reply}>"><img src="<{$xoops_url}>/images/icons/reply.gif" alt="<{$lang_reply}>" /></a> <{elseif $xoops_isuser == true || $anon_canpost == true}> <a href="<{$replycomment_link}>&com_id=<{$comment.id}>"><img src="<{$xoops_url}>/images/icons/reply.gif" alt="<{$lang_reply}>" /></a> <{/if}> </div>
Copy this code just after the <{/ if }> from the comment date Now, delete the bottom buttons. Just delete the lines between the last < tr >< /tr > , and delete the tags < tr >< /tr > too.  2f - Style - Delete title and picture title : Delete line
 le="color: #000000"><?php <div class="comTitle"><{$comment.image}><{$comment.title}></div>
- Add fixed width on the left column le="color: #000000"><?php <td style="width:120px;"><a id="comment<{$comment.id}>"></a></td>
- Delete class "odd" to the 'td' where the poster avatar is, then put the picture in middle position le="color: #000000"><?php <td style="text-align:center;"> <img class="comUserImg" src="<{$xoops_upload_url}>/<{$comment.poster.avatar}>" alt="" /> </td>
 2g - Add an arrow We need to work on the style.css file, in the mytheme theme to create this arrow in CSS. For my theme, it is in /www/themes/mytheme/css/style.css Add this code in style.css :
 le="color: #000000"><?php .arrow-left { width: 0px; height: 0px; border-style: solid; border-width: 25px 20px 25px 0; border-color: transparent #ECE9D8 transparent transparent; }
You could change the arrow color, this color is same as the color class "odd" Add 1 column. Add 1 column in order to put our new arrow at left from comment. - Add tag le="color: #000000"><?php <td></td>
after le="color: #000000"><?php <td style="width:120px;"><a id="comment<{$comment.id}>"></a></td>
- Add tag le="color: #000000"><?php <td></td>
beforele="color: #000000"><?php <td class="odd"><div class="comText"><{$comment.text}></div></td>
On the second tag, insert this code : le="color: #000000"><?php <div class="arrow-left"></div>
and a fixed 20 pixel width style : So, we got : le="color: #000000"><?php <td style="width:20px;"><div class="arrow-left"></div></td>
2f - Style Add 2 break lines for cleared diplay. Put it just before the name poster. le="color: #000000"><?php <td><br /><br /><{$comment.poster.uname}>
That 's all. you have finihed... 3 - full system_comment.html file For webmasters who want the full file system_comment.html, it is here, available : le="color: #000000"><?php <!-- start comment post --> <tr> <td style="width:120px;"><a id="comment<{$comment.id}>"></a></td> <td></td> <td><br /><br /><{$comment.poster.uname}> a dit le <{$comment.date_posted}> <{if $comment.date_posted != $comment.date_modified}> (modifié le <{$comment.date_modified}>) <{/if}> <div style="float:right;"> <{if $xoops_iscommentadmin == true}> <a href="<{$editcomment_link}>&com_id=<{$comment.id}>" title="<{$lang_edit}>"><img src="<{$xoops_url}>/images/icons/edit.gif" alt="<{$lang_edit}>" /></a> <a href="<{$deletecomment_link}>&com_id=<{$comment.id}>" title="<{$lang_delete}>"><img src="<{$xoops_url}>/images/icons/delete.gif" alt="<{$lang_delete}>" /></a> <a href="<{$replycomment_link}>&com_id=<{$comment.id}>" title="<{$lang_reply}>"><img src="<{$xoops_url}>/images/icons/reply.gif" alt="<{$lang_reply}>" /></a> <{elseif $xoops_isuser == true && $xoops_userid == $comment.poster.id}> <a href="<{$editcomment_link}>&com_id=<{$comment.id}>" title="<{$lang_edit}>"><img src="<{$xoops_url}>/images/icons/edit.gif" alt="<{$lang_edit}>" /></a> <a href="<{$replycomment_link}>&com_id=<{$comment.id}>" title="<{$lang_reply}>"><img src="<{$xoops_url}>/images/icons/reply.gif" alt="<{$lang_reply}>" /></a> <{elseif $xoops_isuser == true || $anon_canpost == true}> <a href="<{$replycomment_link}>&com_id=<{$comment.id}>"><img src="<{$xoops_url}>/images/icons/reply.gif" alt="<{$lang_reply}>" /></a> <{/if}> </div> </td> </tr> <tr> <{if $comment.poster.id != 0}> <td style="text-align:center;"> <img class="comUserImg" src="<{$xoops_upload_url}>/<{$comment.poster.avatar}>" alt="" /> </td> <{else}> <td class="odd"> </td> <{/if}> <td style="width:20px;"><div class="arrow-left"></div></td> <td class="odd"> <div class="comText"><{$comment.text}></div> </td> </tr> <tr><td></td><td></td><td></td></tr> <!-- end comment post -->
Sure, i know it's not perfect, and we could do more: - Delete "table" to replace by "div", - Dont define css style in the code, but use class. - Round corners, - ... But the objective here wasn't to to get a perfect code. It was to understand overloaded themes, and show step by step how to modify the design of the comments block. Conclusion : I hope that with this news it's now more clear for you how to modify your design of your blocks and templates in your theme. If this news is usefull for you, please tell me how it feels in the comments block !!! hahahahaha !
Using templates pages in modules
Hello,
A lot of people using XOOPS, need to use templates for presenting homogeneous pages :
- cooking,
- some books,
- some movies,
- ...
I would show you how to use a template to generate your pages :
Advantages:
- Same template for all pages
- Homogeneous and more clear presentation
- Using of pre-defiined pages
Creating a Template (gabarits) in 6 steps:
1 - TinyMCE editor activation for modules
2 - Add the template botton
3 - Create template files
4 - Create a definition file for templates
5 - upload files on server
6 - Use
1 - TinyMCE editor activation for modules (See this editor in demo here)
Administration / Preferences / systeme Module Settings / Editor Settings / Editor for all modules: : tinymce
(or choose TinyMCE for default editor for the module that you will use, in module preferences)
2 - Add the template button
Modify the file /class/xoopseditor/tinymce/settings.php:
Line 70, change
then line 85
(Here it is for indicate that templates are in the directory /uploads/gabarits and definition's file of the template is liste-gabarits.js
3 - Create template files
Theses files must be in html format, but without < html >, < body > or <head >
Here, we create 2 html files:
- fiche-cooking.html,
- fiche-book.html.
Please, make a clean html file, with fixed positions...
For example, for the template 'cooking' :
Title of the cooking :
Ingredients :
Difficulty to make :
...
4 - Create the definition's file of the template
Here, create the file liste-gabarits.js :
5 - upload files on server
On /uploads/gabarits, uploads files :
- liste-gabarits.js
- fiche-cooking.html,
- fiche-book.html.
- index.htlm ( same as in another directory)
6 - Use
Go to module (news for example), then click on the "template" icon then, in the opening window, select the template that you want to use (fiche-cooking for create a page for "Apple cake", for example)
Thats' all !
It is nice ?
Let me know what you think. I will appreciate your comments !
PS 1 : Big thanks to montuy337513 for the support in the XOOPS France Forum.
PS 2 : it would be nice to have this option available by default in the next XOOPS version, wouldn't it?
Read more... | 3 comments
A lot of people using XOOPS, need to use templates for presenting homogeneous pages :
- cooking,
- some books,
- some movies,
- ...
I would show you how to use a template to generate your pages :
Advantages:
- Same template for all pages
- Homogeneous and more clear presentation
- Using of pre-defiined pages
Creating a Template (gabarits) in 6 steps:
1 - TinyMCE editor activation for modules
2 - Add the template botton
3 - Create template files
4 - Create a definition file for templates
5 - upload files on server
6 - Use
1 - TinyMCE editor activation for modules (See this editor in demo here)
Administration / Preferences / systeme Module Settings / Editor Settings / Editor for all modules: : tinymce
(or choose TinyMCE for default editor for the module that you will use, in module preferences)
2 - Add the template button
Modify the file /class/xoopseditor/tinymce/settings.php:
Line 70, change
le="color: #000000"><?php "paste,fullscreen,visualchars,nonbreaking,inlinepopups",
byle="color: #000000"><?php "paste,fullscreen,visualchars,nonbreaking,inlinepopups,template",
then line 85
le="color: #000000"><?php "theme_advanced_buttons4" => "xoopsimagemanager,xoopsemotions,xoopsquote,xoopscode,xoopsmlcontent",
byle="color: #000000"><?php "theme_advanced_buttons4" => "xoopsimagemanager,xoopsemotions,xoopsquote,xoopscode,xoopsmlcontent,template", "template_external_list_url" => '/uploads/gabarits/liste-gabarits.js',
(Here it is for indicate that templates are in the directory /uploads/gabarits and definition's file of the template is liste-gabarits.js
3 - Create template files
Theses files must be in html format, but without < html >, < body > or <head >
Here, we create 2 html files:
- fiche-cooking.html,
- fiche-book.html.
Please, make a clean html file, with fixed positions...
For example, for the template 'cooking' :
Title of the cooking :
Ingredients :
Difficulty to make :
...
4 - Create the definition's file of the template
Here, create the file liste-gabarits.js :
le="color: #000000"><?php // JavaScript Document var tinyMCETemplateList = [ // Nom, URL, Description ["Fiche cuisine", "/_uploads/gabarits/fiche-cooking.html", "Template for the cooking."], ["Fiche Livre", "/_uploads/gabarits/fiche-book.html", "Template for books."] ];
5 - upload files on server
On /uploads/gabarits, uploads files :
- liste-gabarits.js
- fiche-cooking.html,
- fiche-book.html.
- index.htlm ( same as in another directory)
6 - Use
Go to module (news for example), then click on the "template" icon then, in the opening window, select the template that you want to use (fiche-cooking for create a page for "Apple cake", for example)
Thats' all !
It is nice ?
Let me know what you think. I will appreciate your comments !
PS 1 : Big thanks to montuy337513 for the support in the XOOPS France Forum.
PS 2 : it would be nice to have this option available by default in the next XOOPS version, wouldn't it?
Tutorial: A nice Chat for XOOPS - 123flashchat
I will show you in this tutorial how to install a Chat for XOOPS.
Oh, I hear you here saying : "Oh no, yet another poorly designed and not user friendly chat !"
False!!! Here you can see the beautiful and friendly users interface:

Login
Search
Recent Comments
Donat-O-Meter
| Stats | |
| Goal: | $15.00 |
| Due Date: | Jul 31 |
| Gross Amount: | $0.00 |
| Net Balance: | $0.00 |
| Left to go: | $15.00 |
|
|
|
Latest GitHub Commits
Archives
News archives
- January 2017
- November 2016
- October 2016
- September 2016
- August 2016
- July 2016
- June 2016
- May 2016
- April 2016
- March 2016
- February 2016
- January 2016
- December 2015
- November 2015
- October 2015
- September 2015
- July 2015
- May 2015
- April 2015
- March 2015
- February 2015
- January 2015
- December 2014
- November 2014
- October 2014
- September 2014
- August 2014
- July 2014
- June 2014
- May 2014
- April 2014
- March 2014
- February 2014
- January 2014
- December 2013
- November 2013
- October 2013
- September 2013
- August 2013
- July 2013
- June 2013
- May 2013
- April 2013
- March 2013
- February 2013
- January 2013
- December 2012
- November 2012
- October 2012
- September 2012
- August 2012
- July 2012
- June 2012
- May 2012
- April 2012
- March 2012
- February 2012
- January 2012
- December 2011
- November 2011
- October 2011
- September 2011
- August 2011
- July 2011
- June 2011
- May 2011
- April 2011
- March 2011
- February 2011
- January 2011
- December 2010
- November 2010
- October 2010
- September 2010
- August 2010
- July 2010
- June 2010
- May 2010
- April 2010
- March 2010
- February 2010
- January 2010
- December 2009
- November 2009
- October 2009
- September 2009
- August 2009
- July 2009
- June 2009
- May 2009
- April 2009
- March 2009
- February 2009
- January 2009
- December 2008
- November 2008
- October 2008
- September 2008
- August 2008
- July 2008
- June 2008
- May 2008
- April 2008
- March 2008
- February 2008
- January 2008
- December 2007
- November 2007
- October 2007
- September 2007
- August 2007
- July 2007
- June 2007
- May 2007
- April 2007
- March 2007
- February 2007
- January 2007
- December 2006
- November 2006
- October 2006
- September 2006
- August 2006
- July 2006
- June 2006
- May 2006
- April 2006
- March 2006
- February 2006
- January 2006
- December 2005
- November 2005
- October 2005
- September 2005
- August 2005
- July 2005
- June 2005
- May 2005
- April 2005
- March 2005
- February 2005
- January 2005
- December 2004
- November 2004
- October 2004
- September 2004
- August 2004
- July 2004
- June 2004
- May 2004
- April 2004
- March 2004
- February 2004
- January 2004
- December 2003
- November 2003
- October 2003
- September 2003
- August 2003
- July 2003
- June 2003
- May 2003
- April 2003
- March 2003
- February 2003
- January 2003
- December 2002
- November 2002
- October 2002
- September 2002
- August 2002
- July 2002
- June 2002
- May 2002
- April 2002
- March 2002
- February 2002
- January 2002
- December 2001
- January 1970