| 2.8. Groups | ||
|---|---|---|
| Chapter 2. The Admin Interface |    | |
| 2.8. Groups | ||
|---|---|---|
| Chapter 2. The Admin Interface | | |
XOOPS provides a core system of user access rights through the “Groups” settings. This allows the site administrator to control and filter access on at least 3 different user levels. All modules and their associated blocks must have their settings for visibility, rights and access correctly defined in order to achieve correct display and function on the website. Put simply, if you don’t grant these rights for a block to every available group, it won’t be visible on the page
The three default user access groups are as follows:
Anonymous users
Registered users
Webmasters (site administrators)
You can change the name of these default groups, but, you cannot delete them. Other user groups can also be set and defined as discussed later.
Let’s explain the meaning of each default groups. Someone who visits your site is an “Anonymous User”. If a visitor is registered AND logged in to your site, he will be recognized as a “Registered User”. The “Administrators” group automatically contains the primary user you created during the installation.
In a typical web setup we may set group permissions as follows:
“Anonymous users:” Anonymous users may be allowed to view certain content as displayed by a particular module, or groups of modules. When anonymous users visit your site they will automatically see a default level of content for this group without any action on their part.
“Registered users:” Registered users of the site can be granted rights to view and interact with other modules not available to the anonymous group. On initial site visit, assuming there is no auto-login function, they see the default content like any other visitor. However, when they login with their correct user details, the page will reload to include any links, menus and module content accessible to the registered group. The site administrator can design a site to display totally different module content, or simply additional module content to registered users.
“Webmasters” As the creator of the XOOPS site the Webmaster or site administrator has complete and overall rights of access and administration. However, it is possible to promote any registered user to Webmaster status and share your privileges. It is safer to create a custom group and grant module and administration access for selected modules if you wish to allow others to administrate areas of the site.
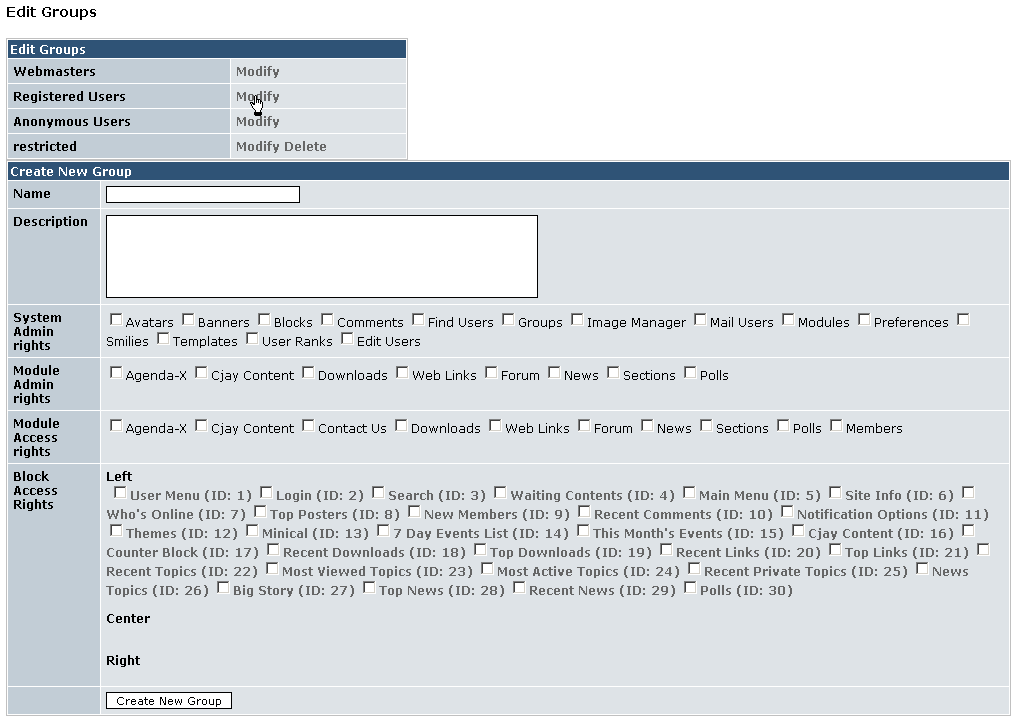
Go to System admin->groups->Edit Groups page.
The “Edit groups” page begins with a section called “Edit Groups” (see Figure 2.7, “Edit Groups”). This allows you to select a specific group to work with and modify. Initially 3 default groups already exist, as described above.
Select a group from this list and click ‘modify’.
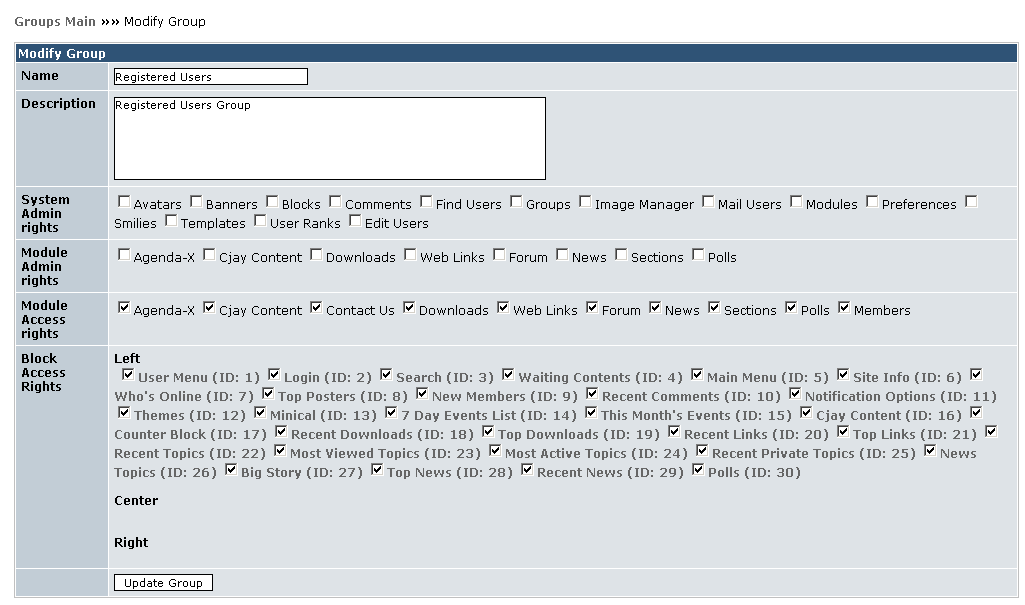
The modify group page is returned (see Figure 2.8, “Modify Groups”). You can now change the name of this group and give a meaningful description in the form boxes provided.
Looking further down the page you will see 4 sections, which represent the 4 sets of rights that can be defined in the permission system. In every section, ticking a checkbox will grant this group the rights as described. If the checkbox is unchecked, this group will not have access to the selected resource.
![[Note]](img/admon/note.png) | Note |
|---|---|
Whenever you make changes to the settings on a page, you must click the “Update Group” button at the bottom before changes take place. | |
Let’s look at each set of rights individually.
“System Admin Rights” - As their name says, System Admin Rights are rights that will control access to the System module. Each item in this sections represent an item found in the Administration Menu->System Admin->Preferences menu. In order to see the System Admin module in the Administration Menu->Control Panel Home page, at least one item has to be checked in this section!
“Module Admin Rights” - As for the Module Admin Rights, the Module Access Rights section lists all the modules currently installed on your site. In order for a group to access a particular module, the corresponding item must be checked in the present section. In addition to not being able to access a module which item has not been checked, the members of the group will not even see that module through the Main Menu. For example: if, for the anonymous users group, the “News” module is checked, when they visit your site, the “News” module will be shown in the main menu and they can access the content (pages) of ‘News’. If the “Forums” module is unchecked it will not show up in the main menu, and they will not be able to access any content in the “Forums” module.
However, using the search function, a member of this group will be able to perform a search in module for which his group does not have access. Of course, the member will only be able to see the title of the items returned by the search and will not be able to actually access the item.
“Block Access Rights” If a module has specific blocks that are available as part of its functionality, they will appear in this section. Each block can be assigned a position on the page (this is detailed in the block section of this manual) If we have already assigned a page position to a block, it will be seen in that position in the “Block Access Rights” section.
Each block displayed is given a system ID number. The name is also a hyperlink to a “block edit” page. For further information on the Block Edit page, please see Section 2.5.3, “Editing a block”.
The final section on each “Modify group” page displays a list box of “Non-members” and “Members”. This list is specific to each group you are viewing.
All registered members will be shown in one of these list boxes. You can remove and add members for any group by using this feature.
The XOOPS Core Development Team recommends that each user be part of only 1 group. Doing this, you’ll be assured that no conflicts occurred.
The final option you have is to 'Create new group'.
Go to Administration Menu->System Admin->Groups->Edit Groups page.
The Create a New Group section displays a familiar table that you have already seen in the 3 default groups with all the modules and blocks installed in the system. Notice they are listed against empty check boxes, until you assign the settings for the new group.
Enter a name and description for the new group. Assign rights and access for each module and block displayed, by filling the check boxes in the same way as the 3 default groups previously.
At the bottom you will see a button for , click this to create the new group you have defined in the page.
Your new group will now appear in the list of groups throughout the site administration pages. Note that the newly created group does not have any members yet. You’ll have to click Modify and add the users you want in the group, as seen on section Section 2.12.5, “Search Options”.
| | |
| 2.7. Find Users | Home | 2.9. Image Manager |