| 2.4. Banners | ||
|---|---|---|
| Chapter 2. The Admin Interface |    | |
| 2.4. Banners | ||
|---|---|---|
| Chapter 2. The Admin Interface | | |
Banners are advertisements displayed in the top section of the page. They may be images or flash movies, e.g. the wildly gyrating XOOPS banner that is part of the default installation. XOOPS has a built in system for managing banners and creating accounts for advertising clients, which is found in the System Module->Banners. You can have multiple banners on a XOOPS site – the display area rotates through each of the active banners in turn each time a new page is loaded.
Each time a banner is displayed to a visitor this counts as one “impression”, which is the common trading currency of banners. Clients typically pay for a certain number of impressions – i.e. to have their advertisement displayed a certain number of times.
Please note: If you are in the business of selling banners based on the number of impressions there is one important thing you should do: Go to System Module->Preferences->General Settings and fill in the Your IP Address field (if you have one). This will prevent your visits to the site from being included in the impression count. Failure to do this could be considered somewhat dishonest (noting, however, that many Administrators don’t have a permanent IP – e.g. those using dial up modems).
The Banner Administration section of the control panel is divided into several sections, described below:
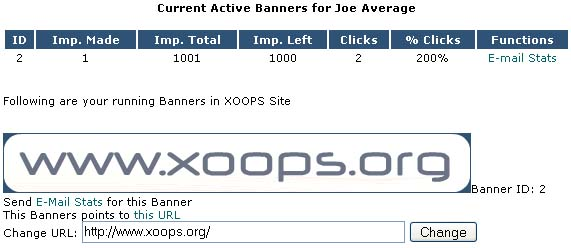
A summary of the details of banners currently being displayed. ‘Banner ID’ is simply a unique identifier. ‘Impressions’ is the number of times the banner has been displayed. ‘Imp. Left’ is the number of paid impressions remaining. ‘Clicks’ is the number of times a visitor has clicked on the banner. This is used to calculate ‘% Clicks’ which is a useful gauge of the effectiveness of a banner – the higher the better. ‘Client Name’ is the owner of the banner.
You can add new banners to your website through this form. The fields are as follows:
| Field | Description |
|---|---|
| Client Name: | Assign the ownership of a banner via this drop down box. The client must be registered first! |
| Impressions purchased: | Enter the number of impressions the client has paid for here. Enter ‘0’ to give them unlimited impressions (this is useful for your own advertisements, or arrangements based on time rather than impressions). |
| Image URL: | Enter the URL to retrieve the banner here. |
| Click URL: | Clicking on the banner will open the URL assigned here. This would normally be the client’s website or a page describing the product. |
| Use HTML? | You may wish or need to use HTML in your banner. Check this box to enable it (it is disabled by default). |
| Code HTML: | If you want to use HTML, enter it in this box. |
Table 2.2. New Banner
Select the ‘edit’ link to open a form that displays the banner and its details. The fields are almost the same as above and may be changed freely. The only difference is that the ‘Impressions Purchased’ field is now called ‘Add More Impressions’; and the number of impressions already paid for / used is also displayed. You can reduce the number of impressions purchased by entering a negative number.
Banners are moved to this section of the control panel as they become inactive (i.e. when the number of impressions left = zero).
A list of your current clients and their details:
Fill in the form to register new advertising clients. This creates an account that the client can login to view the current status of their banner advertisements:
| Field | Description |
|---|---|
| Client Name: | Normally the name of the company. |
| Contact Name: | Your contact at the company. |
| Contact Email: | Make sure you get this right. A summary of current banner statistics will be sent to this address when the client requests a status report (see ‘Client banner accounts’ below). |
| Client Login: | Assign a login name for your client here. You will have to inform clients of their login and password manually. This is entirely separate from the main site login system. |
| Client Password: | Assign a password for your client’s account here. The client cannot change this. Pick something secure. |
| Extra Info: | A discretionary ‘notes’ field, enter anything you like in here. |
Table 2.3. New Client
Clients can check the status of their banners at any time by visiting http://www.yoururl.com/banners.php. This presents a login screen where the client must enter their login and password (assigned by you via the ‘add client’ form).
After login, clients are presented with a table summarising their banner statistics (described in ‘Current active banners’ above), and a display of their currently running banners. The ‘Email Stats’ link enables the client to send the current report, marked with a timestamp, to their contact email address. The client can re-point the banner to any URL they choose via the ‘Change URL’ box. This enables them to redirect the focus of their advertisement as needed.
| | |
| 2.3. Avatars | Home | 2.5. Blocks |